
When you watch your favorite ukulele player playing his ukulele, might be you wonder about his professionalism. You might think of his skills on the ukulele.
However, you also can be a professional ukulele player if you practice regularly “RIGHT THINGS”.
And, one of those right things is fingerpicking skills.
In this blog post, I will introduce you to 20 best ukulele fingerpicking patterns that will transform you from an ordinary player to a professional.
So, do you want to learn those fingerpicking skills?
Let’s start.
Contents
- 20 Best Ukulele Fingerpicking Patterns
- 1. Alternating Thumb Strumming Pattern
- 2. Basic Fingerstyle Pattern
- 3. Three-Finger Roll
- 4. Triplet Fingerstyle
- 5. Travis Picking
- 6. Clawhammer Style
- 7. Campanella Technique
- 8. Fan Stroke
- 9. Pinch and Strum
- 10. Double Stops
- 11. Harmonics
- 12. Arpeggio Roll
- 13. Crosspicking
- 14. Walking Bass Lines
- 15. Flamenco Rhythm
- 16. Slap Technique
- 17. Thumb Roll
- 18. Tremolo
- 19. Harmonic Chimes
- 20. Brush Strum
- Bottom Line
20 Best Ukulele Fingerpicking Patterns
First off,
Disclosure: This post may contain affiliate links, which means we may receive a commission if you click a link and purchase something that we recommended. Read more about Affiliate disclosure here.
1. Alternating Thumb Strumming Pattern
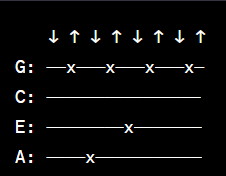
Symbols:
- ↓ and ↑: downward and upward strums
- x: string is strummed
This fingerpicking technique is based on alternating rhythmic picking with the help of your thumb and index finger.
To play this technique, you have to start by plucking G string with your thumb and then pluck the C string with your index finger.
When you repeat the same thing in a rhythm then a pattern creates called alternating thumb fingerpicking pattern.
2. Basic Fingerstyle Pattern
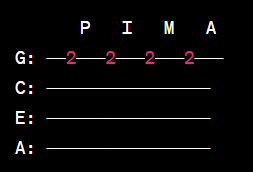
Symbols
- “P” stands for thumb: Use this to pluck G string
- “I” stands for index finger: Use this to pluck C string
- “M” stands for middle finger: Use this to pluck E string
- “A” stands for ring finger: Use this to pluck A string
- Number shows the fret number
This is the most basic fingerpicking technique. Actually, I have to put this on first because every ukulele player starts with this technique.
This fingerpicking technique is the foundation picking for a ukulele. It involves all fingers each for one string. This gives you the flexibility to shift through strings quickly.
In this technique, you have to rest your thumb on G string and use your index, middle and ring fingers to pluck C, E and A strings respectively.
You can use this technique according to your needs that’s why I called it a flexible fingerpicking pattern for ukulele.
3. Three-Finger Roll
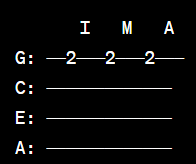
Symbols
- I – Index finger
- M – Middle finger
- A – Ring finger
- Number shows the fret number
In this technique, thumb, index, middle, and ring fingers are used to create a continuous rolling sound.
You have to pluck the strings sequentially with your fingers to create the rolling sound.
To play this technique you have to start by plucking the G-string with your thumb, then C-string with your index finger, E-string with your middle finger, and A-string with your ring finger. When you repeat this pattern, a rolling pattern will create.
4. Triplet Fingerstyle
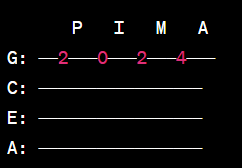
Symbols
- P – Thumb
- I – Index finger
- M – Middle finger
- A – Ring finger
- Number shows the fret number such as 0 for open string and 2 for 2nd fret
This is another popular fingerstyle pattern for ukulele. You have to play 3 notes per beat to add a syncopated feeling to your playing.
It’s easy to play. You just have to use your thumb, index, and middle fingers to pluck 3 strings simultaneously. All pluckings should be in a single downward stroke.
Repeat this pattern in rhythm and you will get a syncopated feel.
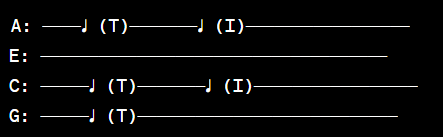
5. Travis Picking

Symbols
- ♩ – Half note
- P or T- Thumb
- I – Index finger
- M – Middle finger
This picking pattern was invented by country guitarist Merle Travis hence the name is Travis Picking.
This picking style combines alternating bass notes with melody notes which creates a complex but smooth and syncopated fingerpicking pattern.
To play this pattern you have to pluck G-string with your thumb, then, C-string with your index finger, then E-string with your thumb, and then A-string with your index finger.
Repeat this pattern in rhythm and emphasize the bass notes because in this pattern bass notes are important.
6. Clawhammer Style
Symbols
- ♩ – Half note
- P or T- Thumb
- I – Index finger
Clawhammer Style is actually banjo plucking style, however, it is used in other instruments too.
In this, you have to strum downwards with the back of your fingernail and use your thumb to play the melody notes. This means you are playing both chords and melody together.
To play this hold your thumb on G-string. Now with the back of your fingernail, strum downward across the strings. When you are strumming downwards, simultaneously pluck the melody on C, E, and A strings with thumb. Repeating this pattern creates Clawhammer Fingerstyle Pattern.
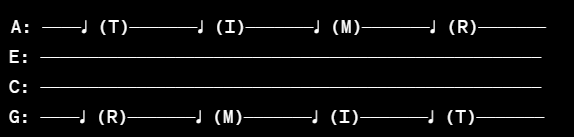
7. Campanella Technique
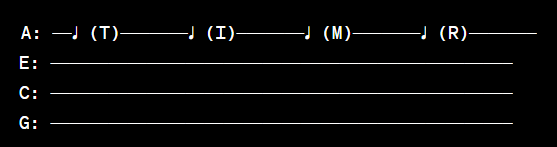
Symbols
- ♩ – symbol represents a quarter note.
- The letter in parentheses indicates the finger symbol corresponding to each note.
- T – represents the thumb.
- I – represents the index finger.
- M – represents the middle finger.
- R – represents the ring finger.
In this fingerstyle technique, you have to play each note of your melody on different string to create a bell-like effect.
Hence this pattern is called Campebella pattern.
To play this technique you should first select a melody. Then play each note on different string. Move sequentially from G to A strings. Repeat this and keep all notes separated. You will listen a flowing ringing sound.
8. Fan Stroke
This pattern needs you to play with your thumb and fingers in a sweepy motion across the strings and creates a full and resonant sound effect.
To play this pattern you have to rest your thumb on G-string. Now use your index, middle, and ring fingers to pluck the C, E, and A strings simultaneously upwards.
Repeating this pattern creates a full and resonant sound effect.
9. Pinch and Strum
Pinch and strum combine pinching the strings and strumming together. When you play this pattern repeatedly it adds rhythmic variety and texture to your playing.
So, how to play this pattern?
It’s simple. Just pinch G and A simultaneously with your thumb and index. And, lightly rest on the remaining strings with your other fingers. Apply this with a strum across all strings. You can strum with your index finger or a pick.
Repeat by alternating between the pinch and strum. This will create and rhythmic and percussive effect.
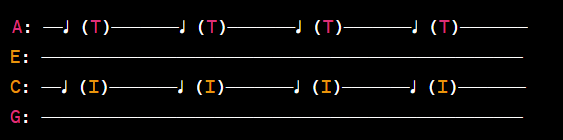
10. Double Stops
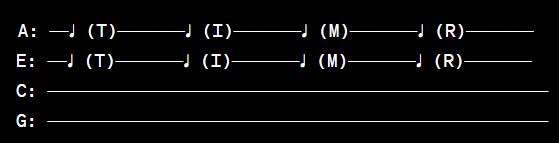
Symbols
- ♩ – symbol represents a quarter note.
- The letter in parentheses indicates the finger symbol corresponding to each note.
- T – represents the thumb.
- I – represents the index finger.
- M – represents the middle finger.
- R – represents the ring finger.
As the name, it involves laying two notes simultaneously which creates a harmonized effect.
You have to pluck 2 adjacent strings with your thumb and index or middle finger. You can experiment with different string combinations, such as G C, C E, or E A etc.
You can use this pattern with different chord progressions and melodies.
11. Harmonics
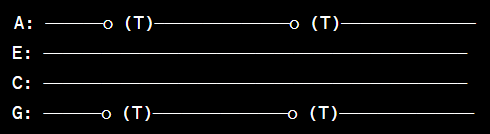
Symbols
- ○ – symbol represents harmonic note.
- T – represents the thumb.
Harmonics are high pitch tones which produce when you lightly touch a certain point of string on your ukulele. This creates a bell like sound.
It’s a bit hard to learn. You should place your finger lightly over the harmonic point which is generally the middle of the string (usually above the 12th fret or 7th fret).
Pluck the string with thumb or index. But keep in mind, the string should not touch the fretboard.
12. Arpeggio Roll

Symbols
- ♩ – symbol represents a quarter note.
- The letter in parentheses indicates the finger symbol corresponding to each note.
- T – represents the thumb.
- I – represents the index finger.
- M – represents the middle finger.
- R – represents the ring finger.
In Arpeggio roll you have to play individual notes of a chord in a rolling fashion. It will create flowing and melodic effect.
Choose one chord shape and pluck the notes one at a time in rolling motion. You should start with the lowest string and progress to highest one.
Repeat this pattern to create a steady and rhythmic sound.
13. Crosspicking
Symbols
- ♩ – symbol represents a quarter note.
- The letter in parentheses indicates the finger symbol corresponding to each note.
- T – represents the thumb.
- I – represents the index finger.
- M – represents the middle finger.
- R – represents the ring finger.
Cross picking is the combination of picking and strumming together.
TO play this one, you have to place your thumb on G and use index, middle, and ring fingers to pluck the C, E, and A strings, respectively.
Along with this, you have to use your thumb or index finger to strum in downward or upward motion. Repeating this pattern build crosspicking technique.
14. Walking Bass Lines
Symbols
- ♩ – symbol represents a quarter note.
- The letter in parentheses indicates the finger symbol corresponding to each note.
- T – represents the thumb.
- I – represents the index finger.
This pattern is based on bass lines that move smoothly and in sequence throughout the chord progression.
This will create a rhythmic effect.
To play, start with the root notes of chords used in the song and use your thumb to pluck the root notes and use other fingers to play melody notes. This is an amazing fingerpicking pattern to play melody and chords simultaneously on ukulele.
15. Flamenco Rhythm
Flamenco is an old fingerpicking technique but nowadays it’s quite popular. T
To play this technique you have to use your thumb, index, and middle fingers to strum the strings rapidly in rhythmic pattern. You should emphasize the downbeats and offbeats.
You should add percussion by tapping the body of ukulele with your palm and fingers.
When you repeat this pattern rapidly, it will create an amazing rhythmic pattern.
16. Slap Technique
Slap technique is generally used in bass guitars, however, it’s quite popular on ukuleles. In this technique, you have to strike the strings with the flesh of your thumb or other fingers.
Hold your hand above the strings and strike them with quick but controlled strike with the flesh of thumb. You can experiment with different finger positions.
It’s a great technique to create a rhythmic effect.
17. Thumb Roll
Thumb roll technique creates when you use your thumb to pluck multiple strings simultaneously in a rolling motion.
To play this technique you have to place your thumb on G and roll across the strings one by one. You can repeat this motion in both downward or upward direction.
Repeat this technique with different chord progressions.
18. Tremolo
Tremolo means a rapid repetition of a single note or a few notes. It creates a trembling effect.
Tomplay this fingerpicking technique you have to put your thumb, index, middle, and ring fingers on just one string and rapidly pluck the string in a repeating motion.
In this technique you need to focus on consistent rhythm and dynamics.
19. Harmonic Chimes
Another great finger picking pattern for ukulele is Harmonic Chimes. In this you have to play harmonics in a specific sequence to create an ethereal sound.
It needs you to learn to play harmonics on your ukulele. Find the harmonic positions on each string which is usually above the 12th or 7th frets.
Now play all strings in a predetermined sequence. You should use a combination of plucking and lightly touching the strings which will create clear and resonant harmonics.
20. Brush Strum
As from the name Brush strum mimics the sound of brushing when you play this technique across the strings.
It’s very easy to play, like, rest your fingers on the strings and brush your fingertips across the strings downwards.
You can experiment with different directions and different pressures to get different brushing sounds.
Bottom Line
So, here were the 20 fingerpicking techniques that you can learn to transform your ukulele skills from a beginner level to pro level.
But, regular practice and guidance are very important. Without practice and proper guidance, you can’t achieve success in ukulele playing.
You can learn my other blog posts which will guide you throughout your ukulele learning journey.
Read them,
Did you know that some of your information can be deemed offensive? As someone who grew up and learning to play the ‘ukulele 56 years ago and played Fingerstyle before that was even accepted as a general term, I never learned the PIMA method as did thousands of players growing up in Hawai’i. I’m finally speaking out because you wrote “everyone” starts out this way so all of us who grew up learn the ‘ukulele in the birthplace of the instrument are not really considered players as we did NOT start off this way so are not a part of the “everyone”. Please don’t rewrite our history of the ‘ukulele and it’s importance in the Hawaiian culture in Hula and our Mele. Do some research before making blanket statements that are not true. Just thought you should know instead of me sharing and posting this so all my fellow ‘ukulele artists and teachers can see. Mahalo for you time.
Rick